Cleaning the ADF (with a cloth)
Use a cloth moistened with Cleaner F1 or a Cleaning Wipe to clean the inside of the ADF.
The inside of the ADF becomes very hot when the scanner is being used.
Before you start cleaning the inside of the ADF, make sure to turn off the power, unplug the power cable and wait for at least 15 minutes for the inside of the ADF to cool down.
If the hopper has been raised, bring it back down to the lower position.
For details, refer to Setting the Loading Capacity of the Hopper.
-
Use a cloth moistened with Cleaner F1 or a Cleaning Wipe to clean the following locations.
- Pick Roller (2 units)
Gently wipe the rollers so that the roller surface does not get damaged.
Wipe along the grooves of the roller surface. Make sure to clean thoroughly because the feeding performance is affected especially when there is black foreign matter on the roller. Remove the rollers for easier cleaning. For information on how to remove the pick rollers, refer to Replacing the Pick Roller.

- Separator Roller (1 unit)
Gently wipe the rollers so that the roller surface does not get damaged.
Wipe along the grooves of the roller surface. Make sure to clean thoroughly because the feeding performance is affected especially when there is black foreign matter on the roller. Remove the roller for easier cleaning. For information on how to remove the separator roller, refer to Replacing the Separator Roller.

- Brake Roller (1 unit)
Gently wipe the rollers so that the roller surface does not get damaged.
Wipe along the grooves of the roller surface. Remove the roller for easier cleaning. For details about removing the brake roller, refer to Replacing the Brake Roller.

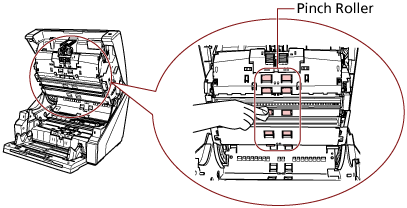
- Pinch Roller
Gently wipe the rollers so that the roller surface does not get damaged.
Clean the whole surface as you rotate the roller manually.
Inside the top cover (rollers: 2 locations × 2 units)
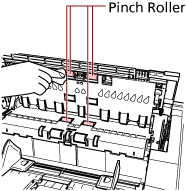
Paper path upper-side (rollers: 6 locations × 2 units)
- Paper Path/Sheet Guide
Give the whole area a quick cleaning.
Paper path upper-side
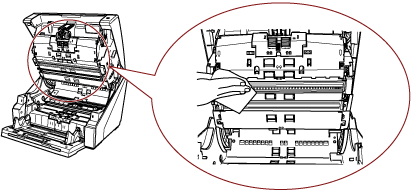
Paper path lower-side
TIPUse a vacuum cleaner if there is a lot of paper dust in the paper path.
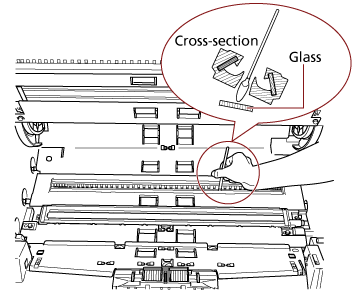
- Scan Glass
Clean it lightly.
Paper path upper-side (glasses: 2 sheets)
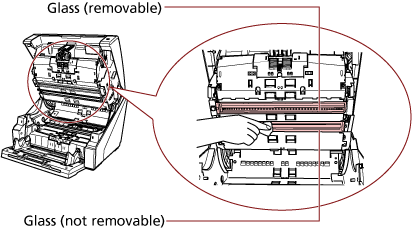 ATTENTION
Normally, the glass should not be removed, because it is designed to block paper dust.
Remove and clean the glass only if the scanner is being used in an environment with large amounts of paper dust and vertical streaks appear on the scanned image even after cleaning the glass.
Use a vacuum cleaner in advance and be careful not to let any paper dust in when removing the glass.
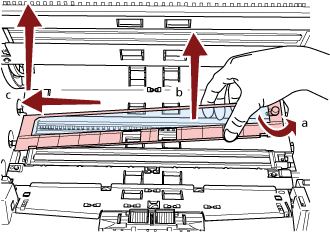
Clean the glass on the paper path upper-side (removable) as follows:
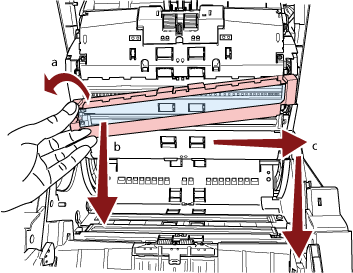
Loosen the screw until the glass can be lifted.
Tilt the glass to the angle as shown above.
Remove the glass as you slide it to the right.
Clean the removed glass.
From the gap where the glass was attached, clean the other layer of glass inside, using a cotton swab or something alike.
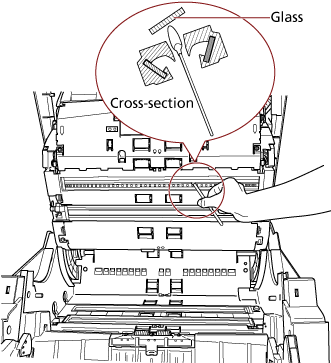
After cleaning, place the glass that you removed back to its original place.
Fasten the screw to fix it in place.
TIPVertical streaks may appear on the scanned image when the glass is dirty.
Paper path lower-side (glasses: 2 sheets)
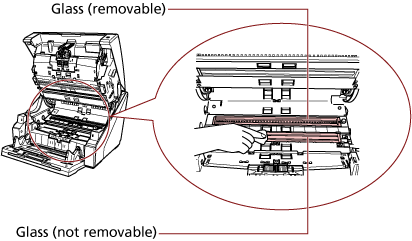 ATTENTION
Normally, the glass should not be removed, because it is designed to block paper dust.
Remove and clean the glass only if the scanner is being used in an environment with large amounts of paper dust and vertical streaks appear on the scanned image even after cleaning the glass.
Use a vacuum cleaner in advance and be careful not to let any paper dust in when removing the glass.
Clean the glass on the paper path lower-side (removable) as follows:
Loosen the screw until the glass can be lifted.
Tilt the glass to the angle as shown above.
Remove the glass as you slide it to the left.
Clean the removed glass.
From the gap where the glass was attached, clean the other layer of glass inside, using a cotton swab or something alike.
After cleaning, place the glass that you removed back to its original place.
Fasten the screw to fix it in place.
TIPVertical streaks may appear on the scanned image when the glass is dirty.
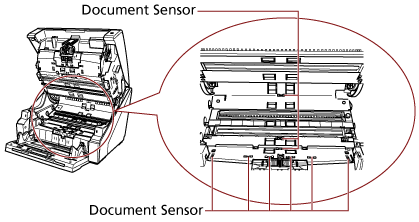
- Document Sensor
Clean off the dust quickly.
Inside the top cover (sensors: 2 units)
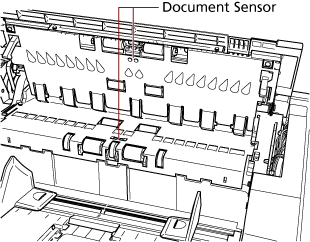
Paper path upper-side (sensors: 9 units)
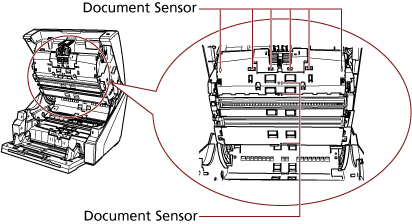
Paper path lower-side (sensors: 9 units)
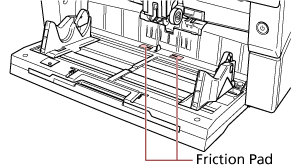
- Friction Pad (2 units)
Clean off the dust quickly.
Friction pads are located on the hopper table.
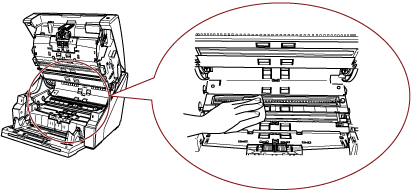
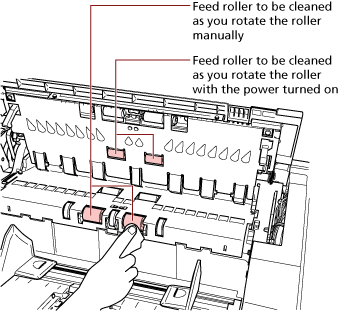
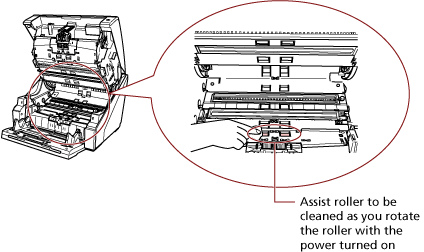
- Feed Roller/Assist Roller
There are two types of feed rollers, one must be cleaned as you rotate the roller manually, and the other must be cleaned as you rotate the roller with the power turned on.
The assist roller must be cleaned as you rotate the roller with the power turned on.
Inside the top cover (rollers: 2 locations × 2 units)
Paper path lower-side (rollers: 5 locations × 2 units)
Paper path lower-side (rollers: 1 location × 2 units)
- Feed Roller to Be Cleaned as You Rotate the Roller Manually
Gently wipe the rollers so that the roller surface does not get damaged.
Clean the whole surface as you rotate the roller manually.
Make sure to clean thoroughly because the feeding performance is affected especially when there is black foreign matter on the roller.
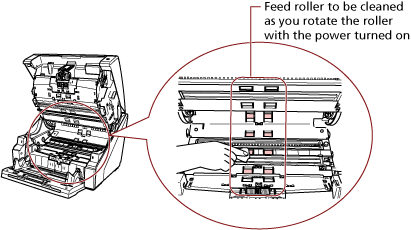
- Feed Roller/Assist Roller to Be Cleaned as You Rotate the Roller with the Power Turned On
Clean the rollers in the following procedure:
Plug in the power cable and turn on the scanner.
For details, refer to How to Turn the Power ON.
[Ready] is displayed on the LCD.
Press the [Menu] button.
[Main Menu] is displayed on the LCD.
Press the [
 ] or [
 ] button and select [21: Cleaning], then press the [Function/Enter] button to confirm.
[Cleaning] is displayed on the LCD.
Press the [
] or [] button and select [2: Wipe], then press the [Function/Enter] button to confirm.A message is displayed on the LCD.
ATTENTIONDo not start scanning with an image scanning application during cleaning.
Open the ADF/top cover.
When you open the ADF with the power turned on, the LED comes on.
For information on how to open the ADF, refer to How to Open the ADF.
For information on how to open the top cover, refer to How to Open the Top Cover.
When the ADF/top cover is open, it might close accidentally. Be careful not to get your fingers caught.
When you open the ADF with the power turned on, the LED comes on.
Do not look at the LED light source directly. Doing so may cause visual impairment. Note that the amount of light from the LED light source that is exposed through the scanner does not pose any risk of eye damage.
When you press the [Scan/Pause] button, the feed rollers/assist rollers rotate a certain amount.
![[Scan/Pause] Button](../common/../images/panel_scan_1.png)
When you press the [Scan/Pause] button, the feed rollers/assist rollers rotate at the same time. When cleaning, be careful not to touch the rollers with your hand while they are rotating.
If you press the [Scan/Pause] button firmly with the ADF open, the ADF might close accidentally. Be careful not to get your fingers caught.
Put a piece of cloth moistened with Cleaner F1 or a sheet of Cleaning Wipe against the surface of the feed roller/assist roller, and wipe horizontally to clean it.
Press the [Scan/Pause] button to rotate the rollers in order to clean dirt and dust off the entire surface of each roller.
Make sure to clean thoroughly because the feeding performance is affected especially when there is black foreign matter on the roller.
As a guideline, pressing the [Scan/Pause] button seven times will rotate the feed rollers/assist rollers one revolution.