Replacing the Pick Roller

Replace the pick roller in following procedure.

HINT

There are two pick rollers. Make sure to replace both units.

  1. Turn off the scanner, unplug the power cable and wait for at least 15 minutes.

    For details, refer to How to Turn the Power OFF.

  2. Remove all documents from the stacker.
  3. Open the ADF.

    For details, refer to How to Open the ADF.

    When the ADF is open, it might close accidentally. Be careful not to get your fingers caught.

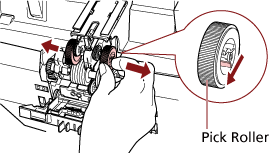
  4. Remove the pick rollers (× 2) from the scanner.
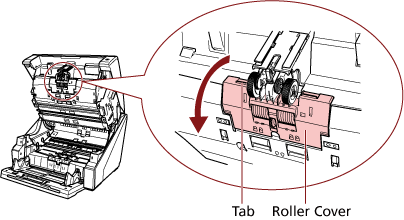
    1. Open the roller cover.

      Grab the tabs on the left and right side with your fingers and pull down the cover towards you.

      Opening the Roller Cover
    2. Grab the tabs on the pick rollers (× 2) to pull the pick rollers off the rotating shaft.
      Removing the Pick Roller
  5. Install a new set of pick rollers (× 2) in the scanner.
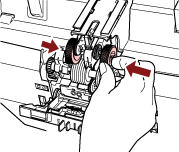
    1. Place the pick rollers (× 2) on the shaft.
      Attaching the Pick Roller
    2. Close the roller cover.

      Make sure that both ends of the cover are locked firmly.

  6. Close the ADF.

    For details, refer to How to Close the ADF.

    Be careful not to get your fingers caught when closing the ADF.

    ATTENTION
    • Do not close the ADF while the roller cover is open.

    • Confirm that the pick rollers are installed properly. When the pick rollers are not installed properly, it causes feeding errors such as paper jams.

  7. Plug in the power cable and turn on the scanner.

    For details, refer to How to Turn the Power ON.

  8. Reset the pick roller counter.

    Use one of the following methods to reset the counter.