Setting the Loading Capacity of the Hopper
If there are only a few documents, you can set the hopper to a higher position and shorten the time to get to the feeding position.
To avoid the risk of jamming your fingers, do not touch the hopper while it is moving up/down.
Do not place anything on top of the hopper while it is moving. The scanner may be damaged if any object is caught inside.
To avoid any contact that may damage the scanner, do not place anything beneath the hopper.
Do not adjust the hopper height from the operator panel when the hopper is closed, as it may damage the hopper.
This function is only available when [Ready] is displayed on the operator panel LCD.
The hopper level can be set for three different capacities.

- (1) Upper:
A maximum of 100 sheets (*1) can be loaded.
- (2) Middle:
A maximum of 300 sheets (*1) can be loaded.
- (3) Lower:
A maximum of 500 sheets (*1) can be loaded.
| *1: | For documents with a paper weight of 80 g/m2 (20 lb). The capacity varies depending on the paper weight of the document. For details, refer to Documents for Scanning. |
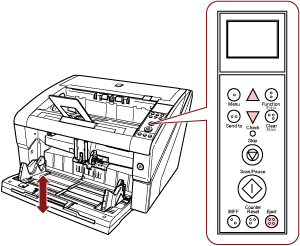
Use the operator panel to adjust the height of the hopper.
Configure by selecting [10: Hopper Level] in the [Main Menu] of the operator panel.
For details, refer to How to Use the Main Menu.
When the scanner has just been powered on, it is set to the [4: Lower] position.
[Hopper Level] can also be displayed by shortcut key. To display [Hopper Level] by shortcut key, press the [Eject] button and either the [![]() ] or [
] or [![]() ] button at the same time when [Ready] is displayed.
] button at the same time when [Ready] is displayed.
Change the hopper level by using the [![]() ] or [
] or [![]() ] button in [Hopper Level].
] button in [Hopper Level].
Note that the [Hopper Level] screen is not displayed unless the two buttons are pressed simultaneously.
When [Hopper Level] is displayed by shortcut key, the screen returns to [Ready] after a certain period of time.
This period of time can be configured in [18: Operation Panel Timeout] of the operator panel.