Processing a Job (With PaperStream NX Manager) [fi-8190/fi-8290/fi-8170/fi-8270]
This section explains about the basic flow of starting a scan by processing a job set in PaperStream NX Manager.
To process a job with the scanner, you need to set up an environment and configure the settings for PaperStream NX Manager.
For details, refer to the PaperStream NX Manager User's Guide.
-
Turn on the scanner.
For details, refer to How to Turn the Power ON.
-
Enter a job group code in the [Job Group Code] screen on the LCD.
- Press the [
 ] button/[
 ] button to select a number (0 to 9), and then press the [Manual Feed] button to move to the next digit.
Enter [123] for a job group code as an example here.
-
Press the [
] button/[] button to select [1], and then press the [Manual Feed] button to move to the next digit. -
Press the [
] button/[] button to select [2], and then press the [Manual Feed] button to move to the next digit. -
Press the [
]/[] button to select [3].
-
- Press the [Scan/Enter] button after a job group code is entered.
The [Job list] screen is displayed.
![[Job list] Screen](../common/../images/panel_joblist.png) HINT
HINTPress the [Stop/Clear] button while the [Job list] screen is displayed to log out and return to the [Job Group Code] screen.
In the factory default setting, if the scanner is left on for a minute with the [Job list] screen displayed, you are automatically logged out from PaperStream NX Manager.
For details about the automatic log-out setting, refer to PaperStream NX Manager.
Names and functions of the operator panel are as follows.
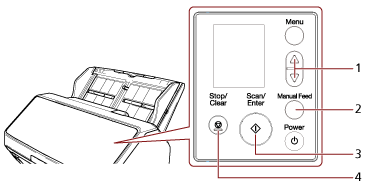
No.
Name
Function
1
[
] button/[] buttonUsed to select the number (within 0 to 9).
Enter numbers starting from the first digit.
2
[Manual Feed] button
Moves to the next digit for you to enter a number in.
The cursor is always at the far right of the input field.
You can enter up to 8 number of digits.
3
[Scan/Enter] button
Logs in to PaperStream NX Manager.
4
[Stop/Clear] button
Deletes the number you entering and moves to the previous digit for you to enter a number in.
The cursor is always at the far right of the input field.
- Press the [
-
Load a document in the ADF paper chute (feeder).
Load the document face-down in the ADF paper chute (feeder).

For details, refer to How to Load a Document in the ADF Paper Chute (Feeder).
-
Select a job in the [Job list] screen on the LCD, and start a scan.
- Press the [] button/[] button to select a job, and then press the [Scan/Enter] button.
Scanning starts.
HINTA message may appear on the screen.
Check the message and press the [Scan/Enter] button to start a scan.
Press the [Stop/Clear] button to return to the [Job list] screen.
- Press the [
![[Job group code] Screen](../common/../images/panel_jobgroupcode.png)