Using the Scanner Connected to PaperStream NX Manager
This section explains the setup procedure for using the scanner connected to PaperStream NX Manager.
For this section, the scanner is connected to the network device via a wired LAN.
-
Connect the scanner to the computer as follows.
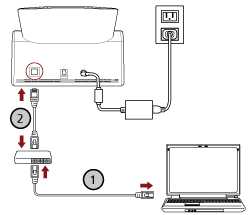
- Connect the computer to a network device via a wired LAN or Wi-Fi (
 ).
).
The procedure below shows an example of connecting the computer to a network device via a wired LAN.
For details about how to connect the computer to the network, refer to your computer manual.
- Connect the scanner to the network device via a wired LAN (
 ).
).
- Connect the computer to a network device via a wired LAN or Wi-Fi (
-
Set the usage method of the scanner.
- Press [How to use] in [Scanner Settings] on the screen that appears when you press
 in the lower part of the touch screen.
- In the [How to use] screen, press [Use by connecting to PaperStream NX Manager] and press the [Next] button.
- In the [PaperStream NX Manager] screen, configure the settings for PaperStream NX Manager and press the [Set] button.
- Press [How to use] in [Scanner Settings] on the screen that appears when you press
-
If necessary, specify the following items in [Scanner Settings] on the screen that appears when you press in the lower part of the touch screen.
For details, refer to Scanner Settings (Touch Screen).
Scanner name
Set a scanner name.
IP address (IPv4)
Set an IPv4 address of the scanner.
When setting the IP address manually, set [Subnet Mask] and [Default Gateway] as well.
ATTENTIONIPv6 addresses are not supported when the scanner is connected to PaperStream NX Manager.
DNS Server
Configure the DNS servers.
When configuring the DNS servers manually, set the IP addresses for [Primary DNS] and [Secondary DNS].
Proxy Server
Set this item to use a proxy server.
TIPThis setting can be configured in the following cases:
When connecting the scanner to PaperStream NX Manager
When linking the scanner to the Scanner Central Admin Server directly
PaperStream NX Manager
Configure the settings for PaperStream NX Manager.
Set [Host Name/IP address] and [Port Number].
To check if the scanner can be connected to PaperStream NX Manager, click the [Check connection] button.
TIPWhen configuring a host name, the DNS servers need to be set on the scanner.
Scanner Central Admin
Set this item to use Scanner Central Admin Server or Scanner Central Admin Desktop in order to manage scanners.
Network Encryption
Specify whether to encrypt network communications.
ATTENTIONAn administrator password is required to display the [Scanner Settings] screen.
You can check the default administrator password by checking whether there is a label or not.
For details about the label, refer to Checking the Product Label.
Change the administrator password to prevent the settings from being changed by other users.
Also, change the administrator password regularly.
The administrator password can be changed in the screen that appears in the following procedure:
→ [Scanner Settings] → [Admin Password]TIPWhen the scanner is connected to a network, the network settings can be changed in fi Series Network Settings.
For details, refer to Network Settings (fi Series Network Settings).