Computer Settings

  1. Confirm that the scanner is connected to the computer, then turn on the scanner.

    For details about how to connect the scanner to the computer, refer to Getting Started.

    For information on how to turn on the power, refer to How to Turn the Power ON.

  2. Display the [Control Panel] window.
    • Windows Server 2012

      Right-click the Start screen, and select [All apps] on the app bar [Control Panel] under [Windows System].

    • Windows Server 2012 R2

      Click [] on the lower left side of the Start screen [Control Panel] under [Windows System].

      To display [], move the mouse cursor.

    • Windows 10/Windows Server 2016/Windows Server 2019/Windows Server 2022

      Click [Start] menu [Windows System] [Control Panel].

    • Windows 11

      Click [Start] menu [All apps] [Windows Tools] and double-click [Control Panel].

  3. Click [View devices and printers].

    The [Devices and Printers] window appears.

  4. Right-click on the scanner icon, and select [Scan properties] from the displayed menu.

    The properties window of the scanner appears.

  5. Click the [Events] tab and select an event.

    From the [Select an event] menu, select an event from which you want to launch an application.

    Computer Settings

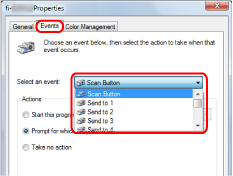
    In this function, the following events can be specified:

    • Scan Button (When the [Scan/Pause] button is pressed)

    • [Send to 01] to [Send to 50] (when the [Send to] button is pressed)

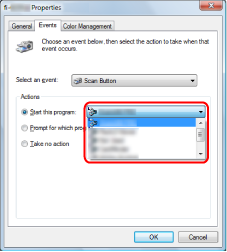
  6. Select an application to be launched by the [Send to] or [Scan] button event and an operation to be performed.

    Click [Start this program] under [Actions], and select an application from the menu shown on the right.

    Computer Settings
  7. Click the [OK] button.

    This completes the computer settings. Proceed to configure the scanner settings.

    HINT
    • The windows that appear and the operations differ depending on the operating system that you are using.

    • To set multiple buttons, repeat steps 5 to 6.