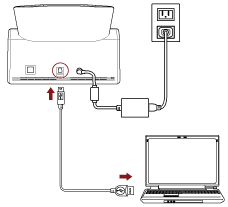
This section explains the setup procedure for using the scanner connected to a computer via a USB cable.
About the procedure from unpackaging the scanner to turning the power on, refer to Getting Started.
-
Turn on the scanner.
-
In the [Display language] screen, select a language, and press the [Next] button.
-
When the [Limited Warranty Guide] screen appears, confirm the displayed information and press the [Next] button.
-
In the [Select Usage] screen, select [Use the scanner connected to a computer] and press the [Complete] button.
-
Install necessary software to the computer which is to be connected to the scanner.
For details about the software and how to install the software, refer to Installing the Software.
Prepare the bundled Setup DVD-ROM.
-
Insert the bundled Setup DVD-ROM into the DVD drive.
The [fi Series Setup] window appears.
-
Start the installation by following the instructions displayed in the screen.
It is recommended that you select [Installation (Recommended)].
-
Connect the scanner to the computer by using the bundled USB cable.
-
Check whether the scanner is ready to start scanning.