Connecting the Scanner to a Computer via the USB Cable in Order to Operate It with the Computer
For the procedure to unpack the scanner, refer to Getting Started.
If an old version of the software is installed, uninstall it first.
For the procedure to uninstall the software, refer to Uninstalling the Software.
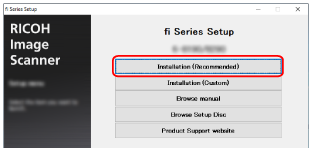
- Select either [Installation (Recommended)] or [Installation (Custom)].
For [Installation (Recommended)]
Select [Installation (Recommended)] to install all the software required to operate the scanner.
Click the [Installation (Recommended)] button.
Install the software by following the instructions displayed in the window.
The [How to Connect the Scanner] window appears when the installation of the software is complete.
TIPWhen [Installation (Recommended)] is selected, the following software is installed:
PaperStream IP (TWAIN)
Network Setup Tool for fi Series
Software Operation Panel
Error Recovery Guide
PaperStream ClickScan
PaperStream Capture
Manual
fi Series Online Update
Note that Network Setup Tool for fi Series is installed for fi-8190/fi-8290/fi-8170/fi-8270/fi-8150/fi-8250.
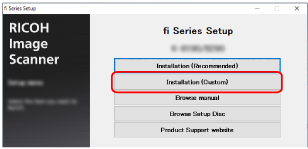
For [Installation (Custom)]
Select [Installation (Custom)] to select and install the software that you need.
Click the [Installation (Custom)] button.
Check the displayed contents and click the [Next] button.
Select the check boxes for the software to be installed and click the [Next] button.
Install the software by following the instructions displayed in the window.
- Select [USB].
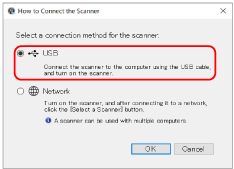
- Connect the scanner to the computer as follows.
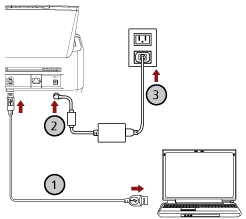
- Connect the scanner to the computer by using the USB cable that is supplied (
 ).
).
- Connect the power cable to the scanner and the AC outlet (
 ,
, ).
).
- Connect the scanner to the computer by using the USB cable that is supplied (