This section explains about the setup procedure for you to connect the scanner to a network device via a wired LAN in order to operate the scanner with PaperStream NX Manager and automatically obtain an IP address for the scanner from the DHCP server.
For the procedure to unpack the scanner, refer to Getting Started.
ATTENTION
If an old version of the software is installed, uninstall it first.
For the procedure to uninstall the software, refer to Uninstalling the Software.
TIP
The factory default setting for obtaining an IP address for the scanner is set to obtain the IP address automatically.
Install the necessary software to operate the scanner with PaperStream NX Manager by referring to the PaperStream NX Manager User's Guide.
Use the Setup DVD-ROM to configure the network settings of the scanner.
-
Turn on the computer and log onto Windows as a user with administrator privileges.
The computer is used to set up the scanner so that it can be operated with PaperStream NX Manager.
-
Insert the Setup DVD-ROM into the DVD drive.
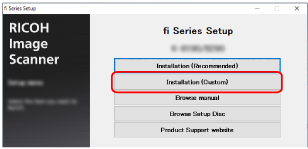
The [fi Series Setup] window appears.
TIP
If the [fi Series Setup] window does not appear, double-click "Setup.exe" in the Setup DVD-ROM via [File Explorer] or [Computer].
- Click the scanner model name to be used (if the window for selecting a model name is displayed).
- Click the [Installation (Custom)] button.
- Check the displayed contents and click the [Next] button.
- Select the check box for one of the following scanner drivers that you want to use.
- Select the [Network Setup Tool for fi Series] check box and click the [Next] button.
- Install the software by following the instructions displayed in the window.
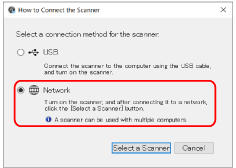
The [How to Connect the Scanner] window appears when the installation of the software is complete.
- Select [Network].
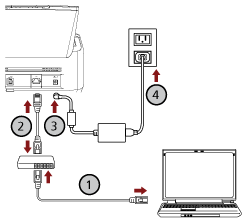
- Connect the scanner to the computer as follows.
- Connect the computer to a network device via a wired LAN or Wi-Fi (
 ).
).
The procedure below shows an example of connecting the computer to a network device via a wired LAN.
For details about how to connect the computer to the network, refer to your computer manual.
- Connect the scanner to the network device via a wired LAN (
 ).
).
- Connect the power cable to the scanner and the AC outlet (
 ,
, ).
).
- Turn on the scanner.
- Click the [Select a Scanner] button in the [How to Connect the Scanner] window.
The [Scanner Selection Tool] window appears.
- In the scanner list, select the IP address of the scanner that you want to use.
The default scanner name is "(Model Name) - (Serial No.)".
The serial number is printed on the label on the back of the scanner, so remove the ADF paper chute (feeder) to check the number. For details, refer to Checking the Product Label.
For details about Scanner Selection Tool, refer to the Network Setup Tool for fi Series Help.
The browser opens and the login window for fi Series Network Settings appears.
- Enter the administrator password, and click the [Login] button.
For details about the administrator password, refer to Admin Password.
The [Scanner Information] window for fi Series Network Settings appears.
- Specify the following items:
Specify each setting item on each web page and click the [Apply to the scanner] button.
For details about each setting item, refer to Network Settings (fi Series Network Settings) [fi-8190/fi-8290/fi-8170/fi-8270/fi-8150/fi-8250].
Scanner name
Set a scanner name.
Scanner Code
Specify whether or not to issue a scanner code.
If the "PaperStream NX Manager" setting is enabled, a scanner code can be used when scanning with a user application on a computer/mobile device/thin client.
Wired LAN
Set an IPv4 address for the scanner.
ATTENTION
An IPv6 address is not supported when the scanner is operated with PaperStream NX Manager.
Network Encryption
Specify whether or not to encrypt network communications.
Proxy Server
Set this item to operate the scanner with PaperStream NX Manager using a proxy server.
PaperStream NX Manager
Set this item to operate the scanner with PaperStream NX Manager.
Select [Enable] check box and specify [Host name/IP address] and [Port number].
Click the [Check connection] button to check if the scanner can be connected to PaperStream NX Manager.
Scanner Central Admin Server
Set this item to operate the scanner with PaperStream NX Manager using Scanner Central Admin Server.
You can monitor scanners or perform a single operation on them at the same time with Scanner Central Admin Server.
- In the scanner list in the [Scanner Selection Tool] window, select the check box for the scanner that you want to use.
- Click the [OK] button to close the [Scanner Selection Tool] window.
-
Click the [Exit] button in the [fi Series Setup] window.
-
Check whether the scanner is ready to start scanning.