Start Up fi Series Network Settings in the following procedure.
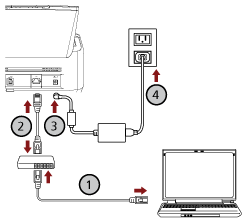
- Connect the scanner to the computer as follows.
- Connect the computer to a network device via a wired LAN or Wi-Fi (
 ).
).
The procedure below shows an example of connecting the computer to a network device via a wired LAN.
For details about how to connect the computer to the network, refer to your computer manual.
- Connect the scanner to the network device via a wired LAN (
 ).
).
- Connect the power cable to the scanner and the AC outlet (
 ,
, ).
).
- Turn on the scanner.
-
Check an IP address of the scanner.
You can check the IP address of the scanner as follows.
For fi-8190/fi-8290/fi-8170/fi-8270
The IP address of the scanner can be checked using one of the following methods.
For fi-8150/fi-8250
The IP address of the scanner can be checked by using IP Address Setting Tool.
For details, refer to the Network Setup Tool for fi Series Help.
For details about how to start up IP Address Setting Tool, refer to Starting Up IP Address Setting Tool [fi-8190/fi-8290/fi-8170/fi-8270/fi-8150/fi-8250].
- Turn on the computer and enter the following URL in the URL input field on the browser to establish a connection with a scanner.
http or https (*1)://IP address of the scanner
- Example
For an IPv4 address
http://xxx.xxx.xxx.xxx/ (xxx should be a value from 0 to 255)
- Example
For an IPv6 address
http://[xxxx:xxxx:xxxx:xxxx:xxxx:xxxx:xxxx:xxxx]/ (xxxx should be a value from 0 to ffff)
| *1: |
Enter "http" when [Encryption Off (HTTP)] is selected for [Network Encryption]. Or, enter "https" when [Encryption On (HTTPS)] is selected.
|
The login window for fi Series Network Settings appears.
- Enter the administrator password, and click the [Login] button.
For details about the administrator password, refer to Admin Password.
The [Scanner Information] window for fi Series Network Settings appears.
- Click each menu to configure the settings.
ATTENTION
To be able to use the function on the window without any problems, make sure that the following settings are configured on your browser.
Cookies are enabled
JavaScript is enabled
![The [Scanner Information] Window for fi Series Network Settings](../common/../images/net_home.png)