Configuring the Settings for a Button on a Computer (For USB Connection)
Configure the settings for the button to be used for starting a scan on your computer.
Specify an image scanning application for the button on the computer, which you want to start up when the button on the scanner is pressed.
You can configure multiple buttons on the computer and select one of the configured buttons for the button on the scanner.
The procedure when the scanner is connected via a USB cable is as follows.
-
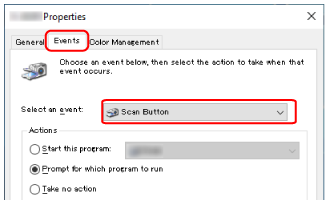
Click the [Events] tab and select a button to be set.
From the [Select an event] drop-down list, select a button.
The following table shows how to apply the button configured on the computer to the button on the scanner that will be used for starting a scan.
Button Configured on the Computer
For fi-8190/fi-8290/fi-8170/fi-8270
For fi-8150/fi-8250/fi-8150U/fi-8250U
How to Apply the Button Settings to the [Scan/Enter] Button
How to Apply the Button Settings to the [Scan/Stop] Button
How to Apply the Button Settings to the [Send to] Button
[Scan Button]
Select [No.00] in the [Function Selection] screen on the scanner.
The indicator displays [F00].
No operation is required.
[Scan Button] configured on the computer is always applied to the [Scan/Stop] button on the scanner.
—
[Send to 01] to [Send to 50]
Select one of the numbers from [No.01] to [No.50] in the [Function Selection] screen on the scanner.
The indicator displays a number from [F01] to [F50] in accordance with the number you selected.
—
—
[Send to 1] to [Send to 9]
—
—
Press the [Function] button to switch the number displayed on the Function Number Display to a number from [1] to [9].
-
Select an image scanning application to be launched when the button is pressed.
Click [Start this program] under [Actions], and select an image scanning application from the program list.
