Paper Jam
If a paper jam occurs, the indicators on the operator panel light up as follows.
Check Indicator |
Power Indicator |
|---|---|
On |
On |
Take the following measures.
When a paper jam occurs inside the scanner, refer to When a Paper Jam Occurs to remove jammed documents.
Refer to Documents for Scanning in order to check if the document is suitable for scanning.
A paper jam also occurs when the bottom edge of a document is detected before the designated area is scanned.
Example:
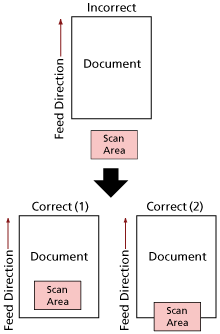
Outside of the document may have been scanned because the scanned document is shorter than the specified paper size.
In this case, take one of the following measures, and then scan again.
Load a document of the specified paper size in the ADF paper chute (feeder).
Change the scan settings so that the scanning area is set inside of the document.
Ways to designate the scanning area differ depending on the image scanning application or the scanner driver. For details, refer to the manual for the image scanning application or the help for the scanner driver.
If paper jams occur frequently, take measures according to Paper Jams/Pick Errors Occur Frequently.
If the problem still persists, write down the status of the indicators, check each item in Before Contacting Your Distributor/Dealer and then contact the distributor/dealer where you purchased this product. Refer to the contact information in the Contact List if supplied with this product, or refer to the contact information in the Contact for Inquiries section if provided in Safety Precautions supplied with this product, and then make an inquiry.