Connecting the Scanner to the Computer via the USB Cable

This section explains about the setup procedure for connecting the scanner to the computer by using the USB cable.

For the procedure to unpack the scanner, refer to Getting Started.

ATTENTION

If an old version of the software is installed, uninstall it first.

For the procedure to uninstall the software, refer to Uninstalling the Software.

  1. Turn on the computer and log onto Windows as a user with administrator privileges.
  2. Download the installer from the download site (http://sp-ne.com/d).
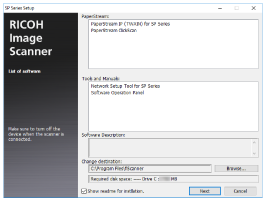
  3. Double-click the downloaded installer.

    The [SP Series Setup] window appears.

    Setup Window
  4. Check the information and click the [Next] button.
  5. Click the [Install] button.
  6. Install the software by following the instructions displayed in the window.

    The [How to Connect the Scanner] window appears when the installation of the software is complete.

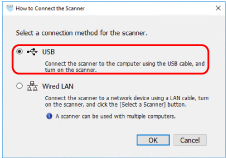
  7. Select [USB] and connect the scanner to the computer as follows.
    USB
    Connecting the USB Cable
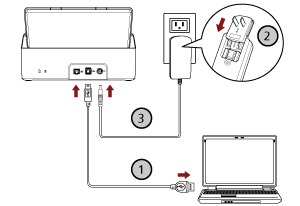
    1. Connect the scanner to the computer by using the USB cable that is supplied (1).
    2. Connect the power cable to the scanner and the AC outlet (2,3).
    3. Turn on the scanner.

      For details, refer to How to Turn the Power ON.

  8. Click the [OK] button in the [How to Connect the Scanner] window.
  9. Click the [Exit] button in the [SP Series Setup] window.
  10. Start an image scanning application, and select the scanner to be used for scanning.

    The scanner name depends on the scanner driver type and the scanner connection method.

    Select the scanner name that is used for a USB connection. For details, refer to the help for the scanner driver.

  11. Check whether the scanner is ready to start scanning.

    For details, refer to How to Perform a Basic Scan.