Performing a Scan with an Image Scanning Application

This section explains about the basic flow of performing a scan using an image scanning application on the computer.

In this case, a scanner driver and an image scanning application that supports the scanner driver must be installed on the computer.

The following scanner driver and image scanning applications are bundled with the scanner:

  • Scanner driver

    • PaperStream IP driver

  • Image scanning application

    • PaperStream ClickScan

HINT
  • For details about the scanner driver and image scanning applications, refer to Overview of the Bundled Software.

  • Scanning procedures, operations, and scan setting items slightly vary depending on the image scanning application and the scanner driver.

    For details, refer to the help for the image scanning application and the scanner driver.

  • Depending on the connection method of the scanner, use only the USB cable to connect to a computer or use only a LAN cable to connect to a network device. Do not use both cables at the same time.

  1. Turn on the scanner.

    For details, refer to How to Turn the Power ON.

  2. Load a document in the ADF paper chute (feeder).

    Load the document face-down in the ADF paper chute (feeder).

    Loading a Document

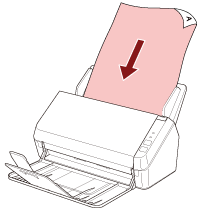
    For details, refer to How to Load Documents.

  3. Start an image scanning application.
  4. Select a scanner driver to be used for scanning.

    For some image scanning applications, selection of a scanner driver may not be needed.

  5. Select the scanner to be used for scanning.

    The scanner name depends on the scanner driver type and the scanner connection method. For details, refer to the help for the scanner driver.

    For some image scanning applications, selection of the scanner may not be needed.

    To use the scanner connected to a network, you need to select the scanner in Scanner Selection Tool beforehand.

    Scanner Selection Tool can be started up in the following procedure.

    • Windows Server 2012

      Right-click the Start screen, and select [All apps] on the app bar [Scanner Selection Tool for SP Series] under [SP Series].

    • Windows Server 2012 R2

      Click [] on the lower left side of the Start screen and select [Scanner Selection Tool for SP Series] under [SP Series].

      To display [], move the mouse cursor.

    • Windows 10/Windows Server 2016/Windows Server 2019/Windows Server 2022

      Click [Start] menu [SP Series] [Scanner Selection Tool for SP Series].

    • Windows 11

      Click [Start] menu [All apps] [SP Series] [Scanner Selection Tool for SP Series].

  6. In the setup window for the scanner driver, configure the scan settings.

    For some image scanning applications, the setup window for the scanner driver may not appear.

  7. Scan the document with the image scanning application.
ATTENTION

Do not perform an operation to disconnect the connection between the scanner and the computer such as the following:

  • Disconnecting the USB cable

  • Disconnecting the LAN cable

  • Disconnecting the network

  • Logging off