Cleaning the Inside of the Scanner (ADF) with a Cloth
The inside of the ADF can be cleaned with a piece of cloth moistened with Cleaner F1, or a sheet of Cleaning Wipe.
As the scanner continues to feed the documents, paper dust will accumulate inside the ADF and it may cause problems related to scanning or affect the scanned results. Cleaning should be performed approximately every 10,000 sheets scanned. Note that this guideline varies depending on the types of documents you scan. For instance, it may be necessary to clean the scanner more frequently when you scan documents on which the toner is not sufficiently fused.
The inside of the ADF becomes very hot when the scanner is being used.
Before you start cleaning the inside of the ADF, make sure to turn off the power, unplug the power cable and wait for at least 15 minutes for the inside of the ADF to cool down.
Do not use water or mild detergent to clean the ADF.
It may take a long time to dry if an excessive amount of Cleaner F1 is used. Use only a small amount. Wipe off the cleaner completely to leave no residue on the cleaned parts.
-
Clean the following locations with a cloth moistened with Cleaner F1, or a sheet of Cleaning Wipe.
- Pick Roller (2 units)
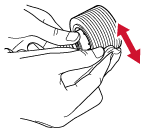
Gently wipe the pick rollers so that the pick roller surface does not get damaged.
Wipe along the grooves of the pick roller surface. Make sure to clean thoroughly because the feeding performance is affected especially when there is black foreign matter on the roller. Remove the pick rollers from the scanner. For information on how to remove the pick rollers, refer to Replacing the Pick Roller.

- Separator Roller (1 unit)
Gently wipe the separator roller so that the separator roller surface does not get damaged.
Wipe along the grooves of the separator roller surface. Make sure to clean thoroughly because the feeding performance is affected especially when there is black foreign matter on the roller. Remove the separator roller from the scanner. For information on how to remove the separator roller, refer to Replacing the Separator Roller.
- Brake Roller (1 unit)
Gently wipe the brake roller so that the brake roller surface does not get damaged.
Wipe along the grooves of the brake roller surface. Remove the brake roller from the scanner. For details about removing the brake roller, refer to Replacing the Brake Roller.

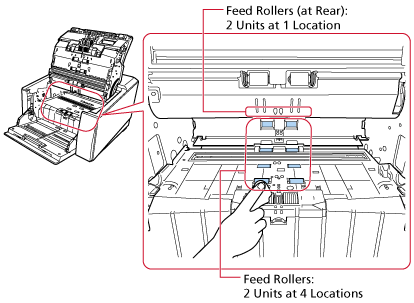
- Feed Roller/Eject Roller
The power must be turned on to rotate the feed/eject rollers for cleaning.
Paper path lower-side (feed rollers: 5 locations × 2 units)
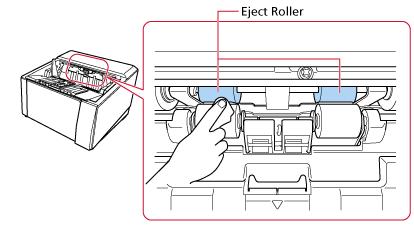
Paper output unit (eject rollers: 1 location × 2 units)
Clean the rollers in the following procedure:
Plug in the power cable and turn on the scanner.
For details, refer to How to Turn the Power ON.
On the touch screen, press
 → [Cleaning & Maintenance] → [Cleaning] → [Cleaning Wipe].
The [Cleaning Wipe] screen is displayed.
ATTENTIONDo not start scanning with an image scanning application during cleaning.
Follow the instructions below in accordance with the part to be cleaned.
When cleaning the feed rollers on the lower side of the paper path
Open the ADF.
For details, refer to How to Open the ADF.
When cleaning the eject rollers in the paper output unit
Open the ADF over halfway (about 70°).
For details, refer to How to Open the ADF.
When the ADF is open, it might close accidentally. Be careful not to get your fingers caught.
If you press the [Start] button on the [Cleaning Wipe] screen on the touch screen, the feed/eject rollers will rotate a certain amount simultaneously.
If you press and hold the [Start] button, the feed/eject rollers rotate continuously.
Be careful not to touch the feed/eject rollers with your hand while they are rotating.
If you press the [Start] button firmly on the [Cleaning Wipe] screen on the touch screen, the ADF may close accidentally. Be careful not to get your fingers caught.
While rotating the feed/eject rollers by pressing the [Start] button, place a piece of cloth moistened with Cleaner F1 or a sheet of Cleaning Wipe against the surface of the rollers and wipe horizontally to clean dirt and dust off the entire surface of the rollers.
Make sure to clean thoroughly because the feeding performance is affected especially when there is black foreign matter on the roller.
As a guideline, pressing the [Start] button seven times will rotate the feed/eject rollers one revolution.
Close the ADF.
For details, refer to How to Close the ADF.
Be careful not to get your fingers caught when closing the ADF.
ATTENTIONConfirm that the ADF is closed properly. Otherwise, documents may not be fed into the ADF.
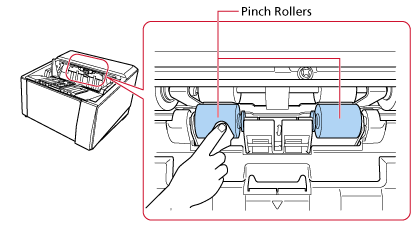
- Pinch Roller
Gently wipe the pinch rollers so that the pinch roller surface does not get damaged.
Clean the whole surface as you rotate the pinch roller manually.
Paper path uppers-side (pinch rollers: 5 locations × 2 units)
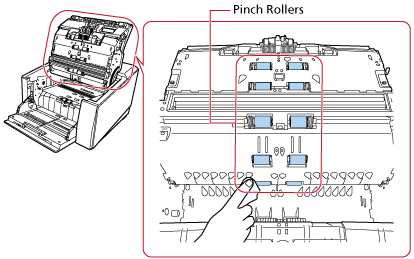
Paper output unit (pinch rollers: 1 location × 2 units)
- Paper Path/Sheet Guide
Give the whole area a quick cleaning.
HINTUse a vacuum cleaner if there is a lot of paper dust in the paper path.
Paper path upper-side
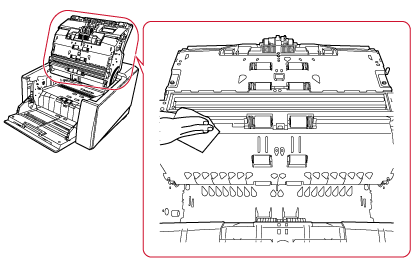
Paper path lower-side
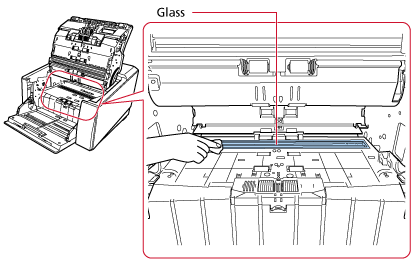
- Glass
Clean it lightly.
HINTVertical streaks may appear on the scanned image when the glass is dirty.
Paper path upper-side (glass: 1 sheet)
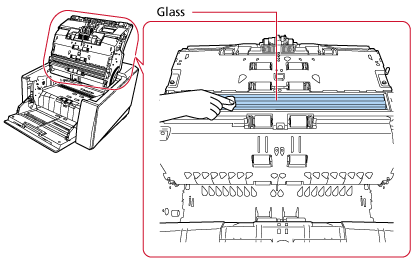
Paper path lower-side (glass: 1 sheet)
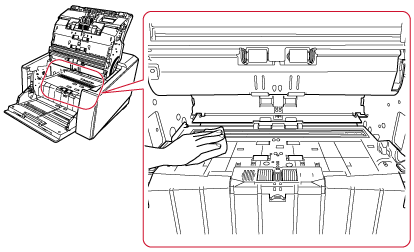
- Ultrasonic sensor
Clean it lightly.
If it is difficult to clean, use a cotton swab.
Paper path upper-side (ultrasonic sensor: 3 units)
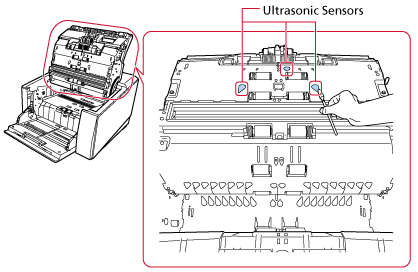
Paper path lower-side (ultrasonic sensor: 3 units)

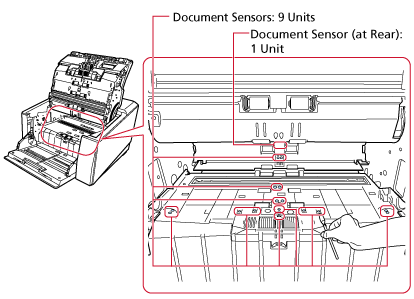
- Document Sensor
Clean it lightly.
If it is difficult to clean, use a cotton swab.
Paper path upper-side (document sensor: 10 units)
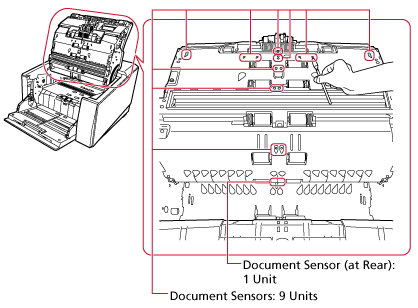
Paper path lower-side (document sensor: 10 units)
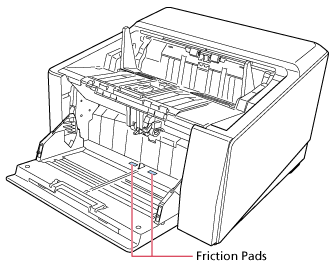
- Friction Pad (2 units)
Clean it lightly.
Friction pads are located on the hopper table.
-
Use one of the following methods to clear the cleaning counter.
The [Cleaning cycle] screen on the touch screen (displayed when the time for cleaning is approaching)
Press the [Clear] button.
The screen can be displayed in the following procedure:
 →
→  → [Cleaning cycle]
The [Consumable counters] screen on the touch screen
Press the [Clear] button for [After cleaning].
The screen can be displayed in the following procedure:
→ [Scanner Settings] → [Cleaning & Maintenance] → [Consumable counters]Software Operation Panel
For details, refer to Clearing the Sheet Counters.