Scanning Photographs and Clippings without Damaging Them
Using the optional Carrier Sheet or Photo Carrier Sheet allows you to scan non-standard size documents such as photographs or clippings without damaging them.
The procedure to perform a scan with the Photo Carrier Sheet is described as an example below.
-
Place a document inside the Photo Carrier Sheet.
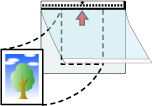
Open the Photo Carrier Sheet and centrally place the top end of the document against the side with a black and white pattern of the Photo Carrier Sheet.
Note that the front side of the Photo Carrier Sheet has a black and white pattern at the top and a thick vertical line in the upper right-hand corner.
-
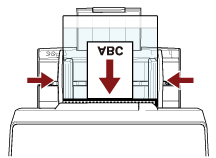
Load the Photo Carrier Sheet with the end with the black and white pattern as the leading edge and with the scanning side facing the ADF paper chute (feeder) (face-down).
Secure the Photo Carrier Sheet with the side guides to avoid skewing.
The image printed on the document is cropped and it is pasted in the center of a blank image. The size of a blank image is the size specified for [Paper Size] in the scanner driver.
- Example
When an image the size of a business card is printed on an A6 size document and [A6] is specified for [Paper Size] in the scanner driver.
→An image the size of a business card is pasted in the center of an A6 size blank image.
An image printed on a document is cropped and output as it is when [Automatic] is specified for [Paper size] in the scanner driver.
- Example
When a business card size image is printed in the center of an A6 size document
→The image is output in A6 size.
In the following cases, place a blank (white) sheet of paper behind the document when scanning.
The scanned image is not output in the actual size of the document when [Automatic] is specified for [Paper size] in the scanner driver.
Shadows appear around the edges of the scanned image.
Black lines appear around the edges of a uniquely shaped cutting.
Image outside the document appears on the scanned image.