When Connecting to a Network Which Requires a Certificate

About the procedure from unpackaging the scanner to turning the power on, refer to Getting Started.

  1. Turn on the scanner.

    For details, refer to How to Turn the Power ON.

  2. Install necessary software to the computer which is to be connected to the scanner.

    For details about the software, refer to Installing Software.

    Prepare the bundled Setup DVD-ROM.

    HINT

    When using PaperStream NX Manager, you do not need to install software from the bundled Setup DVD-ROM. Install a necessary software by referring to the PaperStream NX Manager User's Guide.

    1. If an old version of the software is installed, uninstall it first.

      For details, refer to Uninstalling the Software.

    2. Insert the bundled Setup DVD-ROM into the DVD drive.
      The [fi Series Setup] window appears.
    3. Start the installation by following the instructions displayed in the screen.

      It is recommended that you select [Installation (Recommended)].

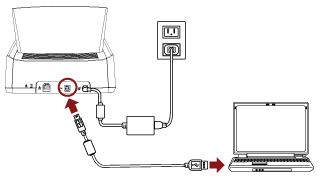
    4. Connect the scanner to the computer by using the bundled USB cable.
      Connecting a USB Cable
    5. Register a certificate with the scanner.

      Use Certificate Registration Tool for fi Series to register a certificate with the scanner.

      For details, refer to the Certificate Registration Tool for fi Series Help.

      Certificate Registration Tool for fi Series can be started up in the following procedure:

      • Windows 10/Windows Server 2016/Windows Server 2019/Windows Server 2022

        Click [Start] menu [fi Series] [Certificate Registration Tool for fi Series].

      • Windows 11

        Click [Start] menu [All apps] [fi Series] [Certificate Registration Tool for fi Series].

    6. Remove the USB cable connecting the scanner and the computer.
  3. Configure the settings to connect the scanner via Wi-Fi on the touch screen of the scanner.

    For details, refer to steps 2 to 7 in When Connecting the Scanner via Wi-Fi.

  4. Configure the settings to use the scanner on the computer.

    Use Scanner Selection Tool for fi Series to select a scanner to be used.

    For details, refer to the Scanner Selection Tool for fi Series Help.

    For details about how to start up Scanner Selection Tool for fi Series, refer to Starting Up Scanner Selection Tool for fi Series.

  5. Check whether the scanner is ready to start scanning.

    For details, refer to How to Perform a Basic Scan.

ATTENTION

To change the scanner settings, the administrator password is required.

You can check the default administrator password by checking whether there is a label or not.

For details about the label, refer to Checking the Product Label.

Change the administrator password to prevent the settings from being changed by other users.

Also, change the administrator password regularly.

The administrator password can be changed in the screen that appears in the following procedure:

Settings [Scanner Settings] [Admin Password]

HINT

The network settings can be changed in the menu that is displayed in the following procedure.

Settings [Scanner Settings] [Network]