About the procedure from unpackaging the scanner to turning the power on, refer to Getting Started.
-
Turn on the scanner.
-
In the screen which asks whether or not to connect via Wi-Fi, press the [No] button.
-
In the screen for selecting a connection method, select [USB] and press the [Next] button.
-
Check the setting items and their order on the screen displayed, and press the [Start] button.
-
Specify the following items:
Scanner name
Set a scanner name.
When you finish setting the relevant items, the screen indicates that the setting process is complete.
-
Check the items that are set and press the [Complete] button.
-
Install necessary software to the computer which is to be connected to the scanner.
For details about the software, refer to Installing Software.
Prepare the bundled Setup DVD-ROM.
- If an old version of the software is installed, uninstall it first.
- Insert the bundled Setup DVD-ROM into the DVD drive.
The [fi Series Setup] window appears.
- Start the installation by following the instructions displayed in the screen.
It is recommended that you select [Installation (Recommended)].
-
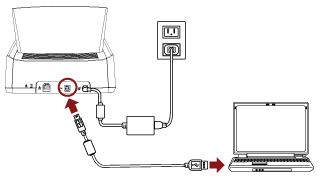
Connect the scanner to the computer by using the bundled USB cable.
-
Check whether the scanner is ready to start scanning.
ATTENTION
To change the scanner settings, the administrator password is required.
You can check the default administrator password by checking whether there is a label or not.
For details about the label, refer to Checking the Product Label.
Change the administrator password to prevent the settings from being changed by other users.
Also, change the administrator password regularly.
The administrator password can be changed in the screen that appears in the following procedure:
 → [Scanner Settings] → [Admin Password]