Replacing the Pick Roller
Replace the pick roller in following procedure.
-
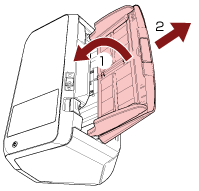
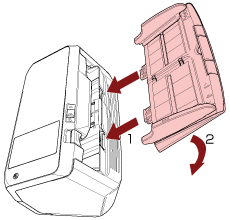
Remove the ADF paper chute (feeder).
Hold both ends of the ADF paper chute (feeder), then lift it in the direction of arrow 1 and pull it out in the direction of arrow 2.
-
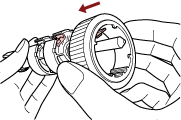
Remove the pick roller.
- Open the sheet guide by lifting the tab.
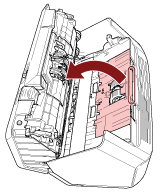
- Rotate the bushing on the shaft in the direction of the arrow.

- Hold the bushing on the shaft to lift up the shaft end, pull the other shaft end out of the slot, and then lift up the pick roller to remove it.

If the animation above does not run, configure the settings of your browser to be able to run the animation.
ATTENTIONBe careful not to touch the gear near the bushing on the shaft because it has grease over it.
- Open the sheet guide by lifting the tab.
-
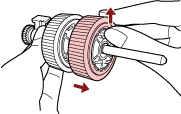
Remove the pick rollers (× 2) one by one from the shaft.
- Pull out the pick roller from the shaft as you lift the retaining clip.
- Pull out the other pick roller from the shaft as you lift the retaining clip.
- Pull out the pick roller from the shaft as you lift the retaining clip.
-
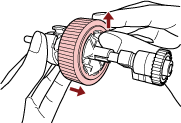
Attach new pick rollers (× 2) on the shaft one by one.
- Insert the retaining clip of the pick roller into the slot.
- Insert the retaining clip of the other pick roller into the slot.
 ATTENTION
Confirm that the pick rollers are attached properly. Otherwise, paper jams or other feeding errors may occur.
Make sure you insert the pick rollers until they lock in place.
- Insert the retaining clip of the pick roller into the slot.
-
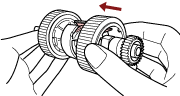
Attach the shaft.
- Hold the bushing on the shaft and insert the other shaft end into the slot on the right diagonally from the upper left. Lower the shaft end with the bushing to fit the entire shaft in and rotate the bushing backward until the shaft locks in place.

If the animation above does not run, configure the settings of your browser to be able to run the animation.
- Hold the bushing on the shaft and insert the other shaft end into the slot on the right diagonally from the upper left. Lower the shaft end with the bushing to fit the entire shaft in and rotate the bushing backward until the shaft locks in place.
-
Attach the ADF paper chute (feeder).
Insert the tabs into the slots on the back of the scanner in the direction of arrow 1 and tilt the ADF paper chute (feeder) downwards in the direction of arrow 2 until it locks in place.
Attach the ADF paper chute (feeder) with the side guides facing upwards.
 ATTENTION
Do not leave any space between the ADF paper chute (feeder) and the scanner.
-
Clear the pick roller counter.
- On the touch screen, press
 → [Cleaning & Maintenance] → [Consumable counters].
- On the [Consumable counters] screen, press the [Clear] button for [After Replacing the Pick Roller].
To clear the counter in the Software Operation Panel, refer to Clearing the Sheet Counters.
- On the touch screen, press