Image
- Automatic Page Size Detection
When the scanner is set to detect the paper size automatically, specify whether or not to optimize (round up/down) the fractional part of the scanned image.
When the paper size is detected, there may be a fractional part of the scanned image compared to the standard paper size.
Output image size varies depending on how the fractional part is processed.
Optimize
Prevents loss of information.
However, a shadow may appear around the edges of images.
This is the factory default setting.
Round Down
The image size becomes the standard paper size.
However, when you scan a document with text around the edges, a part of the information may be missing in the output image.
ATTENTIONFor details about setting automatic page size detection, refer to the help for the scanner driver.
HINTThis setting is effective only for scanning images in black & white.
- Page Edge Filler Area
Configure the settings to fill in the shadow or streaks around the edge of the scanned image.
Depending on the condition of the documents that you scan, the shadow of a document may appear as black streaks on the edges of the scanned image.
In this case, remove the black streaks by filling in the edges of the scanned image.
The specified area is filled in white or black, according to the background color.
- Top (mm)
Specify the width of the top margin to fill in. The factory default setting is "0".
- Bottom (mm)
Specify the width of the bottom margin to fill in. The factory default setting is "0".
- Right (mm)
Specify the width of the right margin to fill in. The factory default setting is "0".
- Left (mm)
Specify the width of the left margin to fill in. The factory default setting is "0".
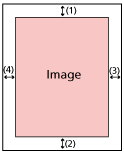
(1): Top = 0 to 15 mm
(2): Bottom = -7 to 7 mm
(3): Right = 0 to 15 mm
(4): Left = 0 to 15 mm
(in 1 mm increments)
ATTENTIONNote that if the target range of page edge filler is too wide, some characters near the edge may appear missing.
HINTYou can change the background color to black or white in the scanner driver.
For details, refer to the help for the scanner driver.
Depending on the value you specify for the bottom margin of the page edge filler, the page edge filler function operates as follows:
1 to 7 mm
Fills in the specified area with the background color from the bottom edge of the image towards the inside.
-1 to -7 mm
Outputs the image without filling in the specified area with the background color from the bottom edge of the image towards the outside. (Outputs the image with the specified area added when [Page End Detection] is set in the scanner driver.)
This setting can also be configured in the scanner driver.
In such a case, the page edge filler of the scanner driver is used on the image which the scanner already filled in the edges.
- Dropout Color
You can exclude a color from being scanned by selecting either red, green, or blue (three primary colors).
Documents can be scanned without excluding any colors.
For example, when scanning a document with black characters and a green frame, if you select green for the dropout color, only the black characters of the document are scanned.
Red
Green
This is the factory default setting.
Blue
None
ATTENTIONThis function works the best with light (low intensity) colors, and dark colors may not be excluded.
You cannot specify a color other than Red, Green, and Blue.
To drop out other colors, configure the setting in the scanner driver.
For details, refer to the help for the scanner driver.
HINTThis is only available in black & white or grayscale mode.
This setting can also be configured in the scanner driver.
Note that priority is given to the scanner driver setting.
- Offset
Specify a starting position for scanning.
The specified value can range from -2 to +2 mm (in increments of 0.5).
The factory default setting is "0".
- Main-scan ADF front (mm)
Specify the horizontal position (widthways) for the ADF front.
- Sub-scan ADF front (mm)
Specify the vertical position (lengthways) for the ADF front.
- Main-scan ADF back (mm)
Specify the horizontal position (widthways) for the ADF back.
- Sub-scan ADF back (mm)
Specify the vertical position (lengthways) for the ADF back.
ATTENTIONNormally, you should not have to modify anything as the factory default settings already use adjusted values.
- Magnification
-
- Magnification (%)
-
Specify the magnification level for the feed direction.
The specified value can range from -3.1 to +3.1% (in increments of 0.1).
The factory default setting is "0.0".
ATTENTIONNormally, you should not have to modify anything as the factory default settings already use adjusted values.
- Image Quality Mode
-
To obtain an image quality that is close to the image quality for scanning with fi-6130Z, set the image quality mode.
Disable
This is the factory default setting.
fi-6130Z